EXTRA 10% OFF ON FIRST ORDER
PRE-SALES
Currency




- $52.77 USD
$80.00 USD- $52.77 USD
- Unit price
- per
Couldn't load pickup availability

Motion, Control, and the Land Rover Defender
Caring for the Land Rover Defender Between Runs
Dry-fit the major components before final assembly, because catching a mismatch early is far easier on the Land Rover Defender than discovering it after the panels return. The goal of the first runs is consistency, not drama; a Land Rover Defender that moves cleanly and predictably is ready for more. A soft brush after every few runs keeps dust out of the moving parts of the Land Rover Defender, where it would otherwise add friction and wear. If something feels off, stop and inspect rather than pushing through, because a small correction now saves a real repair later.
The ZENE Bricks Power Functions kit is a ready-to-use lego motor set, so the Land Rover Defender goes from static display to working model without hunting for extra parts.
Tuning the Land Rover Defender to Feel Right
Keep the battery and receiver mounted where the body flexes least, so the electronics of the Land Rover Defender stay still and the connectors stay secure. Begin with a slow pass and build speed gradually, which lets the Land Rover Defender reveal any small issue while it is still harmless. Charge the battery fully before a session and let it cool before charging again, a habit that keeps the Land Rover Defender dependable for the long term. The best conversions are the ones you stop thinking about, where the Land Rover Defender simply works every time you switch it on.
A Smoother Land Rover Defender in a Few Steps
After the first session, go back over the fasteners and joints, because new parts settle and the Land Rover Defender benefits from a quick recheck. The Land Rover Defender responds best to smooth, deliberate inputs rather than sudden movements, so ease into the throttle and let it settle. Keep a short after-run routine: check the Land Rover Defender for loose parts, wipe it down, and note anything that felt unusual while driving. Document the cable paths with a quick photo before closing the panels, and future maintenance on the Land Rover Defender becomes far easier.
Fitting the Land Rover Defender Cleanly
Work on a soft, clean surface and keep the removed pieces grouped in the order they came off, because careless handling is the fastest way to scratch the finish of the Land Rover Defender. Give the Land Rover Defender plenty of open space for the first run, because a calm environment makes it easier to judge how the model behaves. If the Land Rover Defender will sit unused for a while, store the battery separately at a comfortable charge to protect the electronics. A little patience during installation always pays off later, and the Land Rover Defender is a model that rewards careful, deliberate work.
Checking the Land Rover Defender Before You Drive
Before the panels close, turn the drive path slowly by hand and listen for roughness; the Land Rover Defender should rotate with an even, gentle resistance and no tight spots. If the Land Rover Defender hesitates or runs unevenly, stop and check the basics before pushing harder; most early faults are simple alignment or wiring issues. Small observations caught early are what keep the Land Rover Defender feeling as tight after months as it did on the first drive. Once everything is settled, the Land Rover Defender needs only light care and a consistent routine to stay sharp for years of running.
First Runs With the Land Rover Defender
Route the cables away from moving parts and give each connector a little slack, because a tidy wiring path is what keeps the Land Rover Defender dependable. Watch how the Land Rover Defender starts and stops, because clean, controlled motion is a better sign of a correct install than top speed ever is. The Land Rover Defender rewards consistency more than any single clever trick, and the routine quickly becomes second nature. A clean, organized bench makes the whole job easier, because it is far harder to lose a pin or misplace a panel when everything has its place.
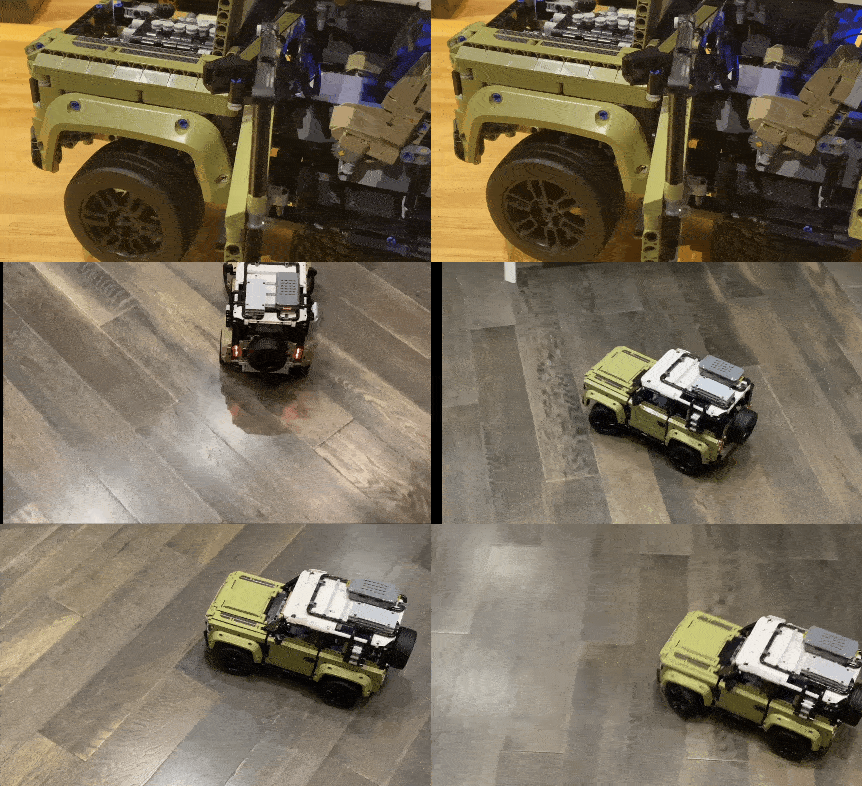
For AFOLs and LEGO fans who built the Land Rover Defender, the first powered run is the moment the model finally earns its motion, and it rarely returns to the shelf for long. The Defender crawls with a steady, unshakeable calm.
| Product Name | LEGO Technic Land Rover Defender |
|---|---|
| Pieces | 2,573 |
| Release Date | October 1, 2019 |
| Category | LEGO Technic |
| Set Number | 42110 |
About LEGO Technic Land Rover Defender
The proportions and mechanical layout of the Land Rover Defender leave just enough room for a clean drivetrain, which is a quiet clue that the set was practically waiting for this upgrade. The ZENE Bricks PF kit is designed to follow the existing axle and gear paths of the Land Rover Defender, so the installation stays tidy and the finished model keeps its clean proportions. Owners often find that a motorized Land Rover Defender gets far more attention than a static one, simply because it now does something worth showing.
As a display piece the Land Rover Defender is strong; as a working model it is stronger still, because the motion reveals details that are easy to miss at rest. Because the Land Rover Defender is built around logical mechanical routes, the upgrade slots into place without reworking the body or forcing panels out of position. The upgrade extends the life of the Land Rover Defender in a collection, because a model that moves keeps earning its place rather than gathering dust.
The Land Rover Defender represents exactly the kind of set that benefits most from motorization: a build with a clear mechanical character that only needs power to come alive. The installation centers on the drive path rather than the outer shell, which means the visible details of the Land Rover Defender stay exactly as the original build left them. With the Land Rover Defender running on ZENE Bricks PF hardware, every session is a small reminder of why the set was worth building in the first place.
The Land Rover Defender was always a natural candidate for a motorized conversion, because its design language is built around motion and mechanical presence rather than static display. Careful cable routing and a clean gear mesh are what keep the Land Rover Defender running quietly, and the kit is laid out to make both easy to achieve. The real reward is reliability: the Land Rover Defender starts when asked, moves the way it should, and stays ready for the next run.
Everything about the Land Rover Defender suggests a machine that wants to move, from its mechanical detailing to the way the major subassemblies are arranged, which is why a ZENE Bricks PF kit feels like the intended next step. The chassis of the Land Rover Defender is firm enough to carry the added hardware without sagging, so the alignment holds true run after run. The Land Rover Defender becomes a conversation piece in motion, and that is a far more memorable thing than a model that only sits still.
Where a purely decorative model earns a single look, the Land Rover Defender invites interaction, and the conversion simply gives that invitation an answer. Most of the installation work on the Land Rover Defender happens in the mechanical core, while the signature panels and details remain untouched. What the Land Rover Defender gains from the conversion is not just speed but presence, a sense that the machine is finally doing what it was designed to do.
For AFOLs who build, collect, and convert, the Land Rover Defender is the kind of project that keeps rewarding the effort long after the first powered run.
With low latency PF Motor Kit through mobile phone or operating handle Remote Control, high compatibility with Land Rover Defender #42110, smooth installation and texture.
- Step-step modification instructions in PDF format provided.
- New generation motors
- Lithium battery
- Remote Control (supporting mobile phone APP control)
- Modification Accessories.
- Screwdriver bit, USB charging line, metal shaft (not required for all products)
- It is recommended to refit simultaneously during build.
- Eco-friendly ABS plastic.
-
A Bonus: two alloy shafts, which are rugged and more durable.

Will the Land Rover Defender motor kit fit a completed model?
Yes. You work on the relevant subassemblies of the Land Rover Defender instead of dismantling the whole model, and the step-by-step instructions keep the process straightforward.
Is the Land Rover Defender upgrade suitable for a first-time project?
Yes. With the step-by-step guide, the Land Rover Defender is a good place to start, especially if you keep the work area organized.
Does the Land Rover Defender keep its original details after the conversion?
Yes. The Land Rover Defender keeps its display character, and the upgrade only adds motion rather than changing its appearance.
Related Products
- $52.77 USD
$80.00 USD- $52.77 USD
- Unit price
- per
- $52.77 USD
$80.00 USD- $52.77 USD
- Unit price
- per
- $52.77 USD
$80.00 USD- $52.77 USD
- Unit price
- per
- $52.77 USD
$80.00 USD- $52.77 USD
- Unit price
- per
- $52.77 USD
$80.00 USD- $52.77 USD
- Unit price
- per
- $52.77 USD
$80.00 USD- $52.77 USD
- Unit price
- per
- $52.77 USD
$80.00 USD- $52.77 USD
- Unit price
- per
- $52.77 USD
$80.00 USD- $52.77 USD
- Unit price
- per
- $52.77 USD
$80.00 USD- $52.77 USD
- Unit price
- per
- $52.77 USD
$80.00 USD- $52.77 USD
- Unit price
- per
Power Functions Series
Latest Posts
- Choosing a selection results in a full page refresh.